Creating a Win32 Window for Direct3D 11 Rendering
What is the first thing you think of when you think of computer graphics and rendering? If you said video games, you wouldn't be alone as its the most prominent example. We've become accustomed to immersing ourselves in fictional or simulated environments as a source of entertainment to escape from the rigors of life. Game developers and graphics card manufactures have always been trying to push the envelope in terms of graphical fidelity. We have seen many demo's from the likes of Epic and Nvidia featuring jaw-dropping rendering techniques such as real-time ray-tracing like the video below.
It wasn't always this way, though; one of the first games ever made used an analogue oscilloscope to render and display its graphics. We quickly used a mixture of display adapters and CPU's to display 2D games like what was seen on the Atari 2600. Eventually we got 3D titles like Wolfenstein3D, Quake and Doom as well as 3D Graphics Processor Units (GPU) to crunch the computations behind them.
With these GPUs that we're able to create and interact with these life like scenes, but how do we interact with a GPU? That question is answered through APIs such as Direct3D 11 and Direct3D 12 from Microsoft or OpenGL and Vulkan from the Khronos Group. These APIs accomplish the same thing: to configure and program the GPU to process a data set and display the results of those computations to the screen.
Before rendering anything to a screen, we first need to open a window. I intend to create a series of posts that cover the first steps of getting a rendering application up and running. This will be the first post of that series where we cover how to create a window for a rendering application.
Intended Audience
Before continuing on with this post, you should know some prerequisites. For my classmates, I will give a strong recommendation that you're in the 4th semester. This post will be utilizing advanced topics that are not taught in the 1st, 2nd, or 3rd semesters. We will be using C++, a far less forgiving language than most. Still, it is a necessary evil when working with graphics APIs. For specific topics that you should have some intermediate knowledge and experience with are the following:
- Programming and software development with a C style language. Preferably C or C++ but not strictly required for understanding concepts behind utilizing the APIs.
- Object-Oriented Design and Programming
- Pointers and memory management
- Vector and Linear Algebra (At least a vague idea)
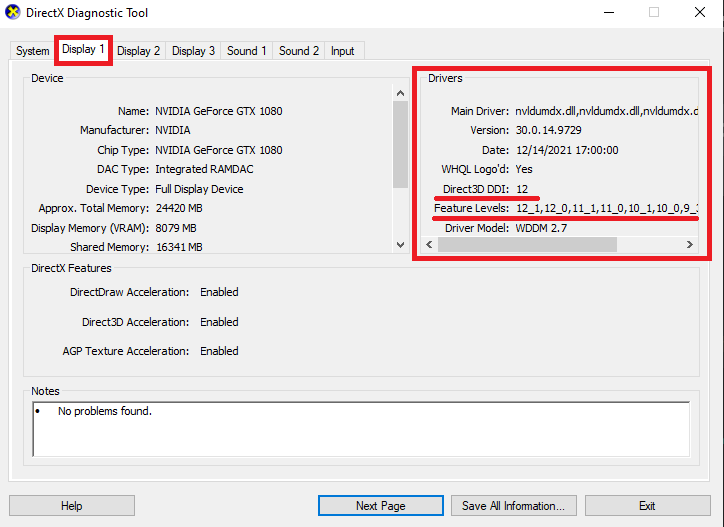
Additionally, it would be best to have a Windows 10 or higher machine with DirectX 11.1 or higher video card that supports feature set 11_1 or higher. We will be using Visual Studio 2019 Community Edition (2017 and 2022 should work with no issues).
If you're unsure of the version and feature set that your card supports you can use the dxdiag tool bundled with Windows to determine that. Run the tool, click the first Display tab, and on the right hand side pane, it should tell you the Direct3D (DDI) version and the Feature Levels.
Outcomes
By the end of this post, I hope to thoroughly explain the steps and concepts behind opening a Win32 window. Additionally, the window created by the end will be compatible with Direct3D
Setting Up Visual Studio
The first step to displaying a window is to create a project, so lets get Visual Studio fired up. Select Create New Project, and from there, we will select the "Windows Desktop Application" and then press next.

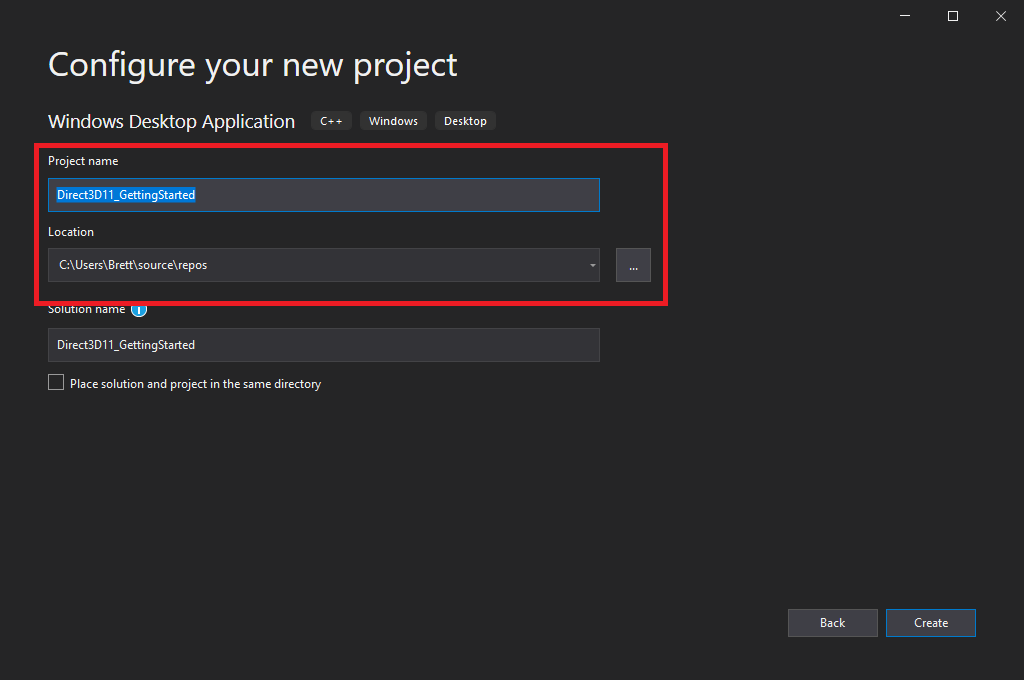
Give your project a name and select where you would like to place it, and press create.
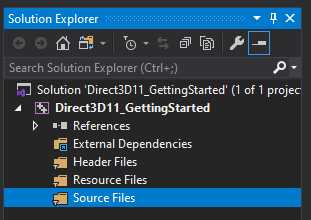
Next, we'll clean our project of any of the pre-generated files. You will need to navigate to the Solution Explorer to delete any .h and .cpp files and any files in the resource folder (filter). Afterwards, your project and solution should look like so.
Now, we add our main cpp file which contains the entry point to your application. Right click on the source folder -> Add -> New Item -> C++ File (.cpp). From there, give it the name of main.cpp.
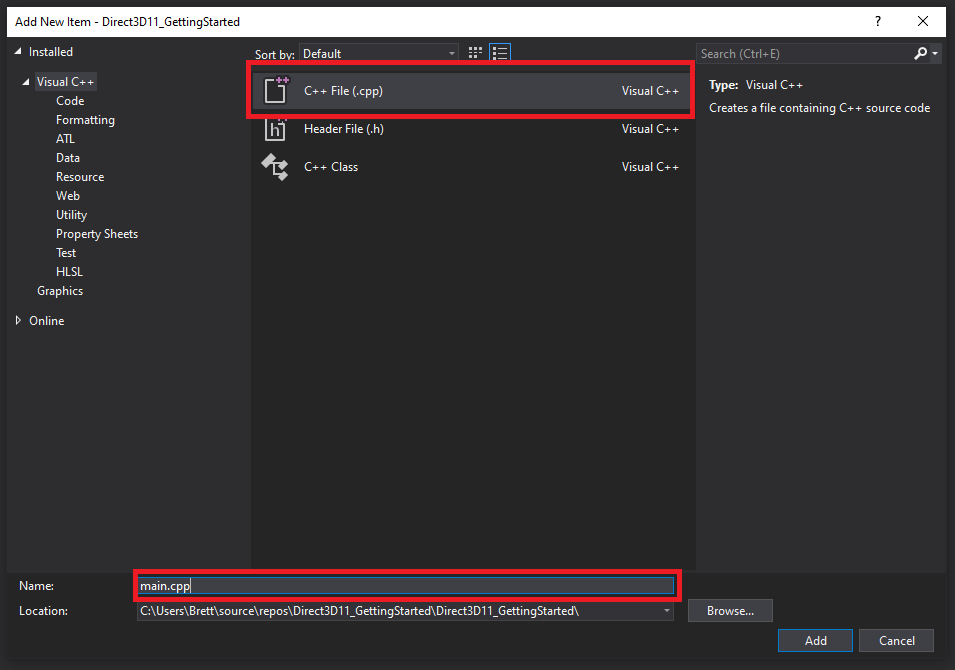
If you did everything correctly, there should be a blank document displayed to you and a file sitting within the source files folder. (Filter is the VS terminology for the folders you see in the Solution Explorer since they're not actually folders on the file system but a filtering tool for within VS.)
We're entirely done yet, though; since we're preparing this project for D3D11 we still need to configure the linker to use the additional dependencies that Direct3D needs. To do this, we will right click on our project (the one with the ++ icon) and select properties. Now, select All Configurations and All Platforms at the top. In the Configuration Properties list on the left, you will choose linker and then all options. You will then click on Additional Dependencies and then click on the drop-down menu on its right and select <edit>.
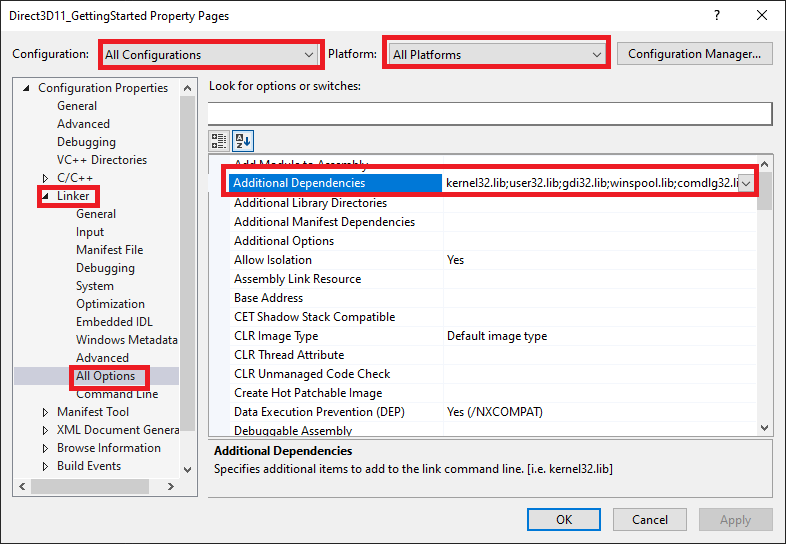
Then copy the three lines below, and add them to the additional dependencies textbox, and press OK.
d3d11.lib
dxgi.lib
d3dcompiler.lib
After you're complete, press Apply and then OK. If you were successful you should see the line below in bold text in the additional dependencies field
d3d11.lib;dxgi.lib;d3dcompiler.lib;%(AdditionalDependencies)One more step is to set our IDE to use an x64 (64 bit) build. The reason for this is so that we don't have to worry about aligning our data to a 16 byte boundary so that we can use SSE intrinsics in the math library. At the top of your IDE, you should see a dropdown box with the value of x86. Click that box and select x64.

We're now ready to begin coding.
Creating a Window
Before we start coding I will state now that this first post will be using very C-like C++ code written using a functional paradigm. This is so that we can abstract away the complexities that idiomatic C++ and OO introduce and focus simply on what's important. With that out of the way, lets write some code!
In the previous steps we added which libraries we were using to the linker, so we now must add the includes to our main.cpp so that we have code declarations for those libraries.
#define WIN32_LEAN_AND_MEAN // Excludes rarely used libraries in Windows.h
#include <Windows.h>     // All of the Win32 stuff.
#include <d3d11_1.h>     // Direct3D library
#include <dxgi.h>        // DirectX Graphics Infrastructure
#include <d3dcompiler.h> // Shader compiler
#include <DirectXMath.h> // SIMD math library utilizing SSE
We will next declare some globals, these include a HWND which is a Win32 window handle and we will use it to keep a reference to our window. We then have the attributes of the window, these include the position of the window on the desktop and its size.
HWND gMainWnd = 0; // Handle to our window
int gXPos = 0; // Window X Position
int gYPos = 0; // Window Y Position
int gWidth = 800; // Window width
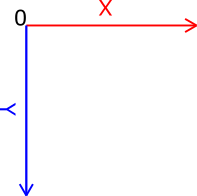
int gHeight = 600; // Window heightYou should note that the position, width and height are in pixels. The coordinate system used for the desktop and windows begins at the top left hand of the display. The x+ direction moves to the right of the display while the y+ direction moves to the bottom of the display. With the graphic below you can see this clearly illustrated.
WinMain
bool InitWindow( HINSTANCE instanceHandle, int show );
LRESULT CALLBACK WndProc( HWND hWnd, UINT msg, WPARAM wParam, LPARAM lParam );
void Run();

int WINAPI WinMain( HINSTANCE hInstance, HINSTANCE hPrevInstance, LPSTR pCmdLine, int nShowCmd )
{
    // Try to create the window. If it fails exit the program.
    if ( !InitWindow( hInstance, nShowCmd ) )
    {
        return 1; // Return Error and exit program.
    }

    // Begin executing the event and render loop.
    Run();

	return 0;
}
We will now declare our function prototypes so that we don't have to write our functions before main. If you read the program from top to bottom it will read in order of execution. As we go further into the source code we will examine the inner workings of them. We are moving onto our WinMain, a modified C++ entry point unique to Windows. This is the entry point of our application, it takes in four arguments. The first is the HINSTANCE hInstance which is a handle to our application in the OS. Next is the same type, but for a previous instance, this argument is a legacy leftover that is no longer used. Next we have LPSTR pCmdLine which is a long pointer string which is just a type definition of c string (char*). This is where command line arguments are passed into the entry point. Next is the int ShowCMD, this states how our program should initially open. e.g. window showing, window hidden etc. Inside of our main we will try to create a window and then call run which takes us into a loop for handling events that are sent to the window.
The Window Procedure (WndProc)
LRESULT CALLBACK WndProc( HWND hWnd, UINT msg, WPARAM wParam, LPARAM lParam )Before we look at creating the window, a few concepts need to be explained first. All Win32 windows are event driven, meaning they receive messages from the OS. There are lots of different messages that can be sent to the window, such as key presses, mouse movement, window movement, windowing resizing, window destruction etc. As developers we're responsible for receiving and handling these messages. The way we handle these messages is through the Window Procedure or WndProc as it's commonly called. The WndProc is capable of handling multiple windows and differentiating between them. The WndProc takes in a window handle (HWND), the message type (UINT msg parameter) as well as the WPARAM and LPARAM which store the details of the message. WPARAM and LPARAM can hold various things, and messages utilize them differently. Hence, you have to read the MSDN docs to know what a message holds. The last part of the signature of a WndProc is the return type, an LRESULT, a simple integer value that's returned based on the message.
LRESULT CALLBACK WndProc( HWND hWnd, UINT msg, WPARAM wParam, LPARAM lParam )
{
switch ( msg )
{
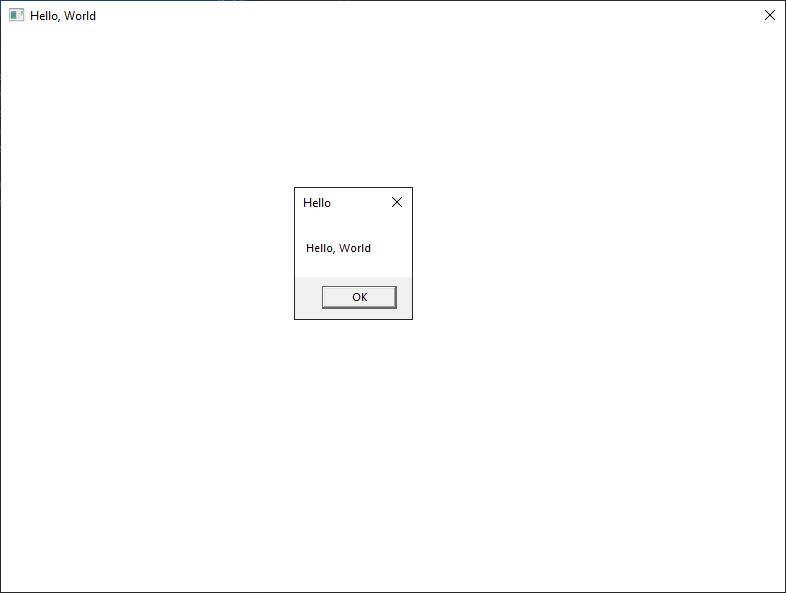
case WM_LBUTTONDOWN: // Left Mousclick
MessageBox( 0, L"Hello, World", L"Hello", MB_OK );
return 0;
case WM_KEYDOWN: // keypress (down position)
if ( wParam == VK_ESCAPE ) // Escape Key
{
DestroyWindow( hWnd );
}
return 0;
case WM_DESTROY: // Window was closed by us or by the user
DestroyWindow( hWnd );
gMainWnd = 0;
PostQuitMessage( 0 ); // Send the quit message
return 0;
default:
return DefWindowProc( hWnd, msg, wParam, lParam ); // Send messages back to the OS.
break;
}
}The guts of a WndProc is a simple switch statement that takes the message parameter, with each case being a message type. Here we are handling the WM_LBUTTON message, a left mouse click, WM_KEYDOWN, a keypress message that fires when a key is in the down state. The VK_ESCAPE is a preprocessor definition for the integer value for the virtual escape key code. (Virtual keys represent real keys.) Next, we have a WM_DESTROY message which we receive when we call DestroyWindow(), or when the User or OS closes the window. After destroying the window, we call PostQuitMessage(), which tells the OS that we are terminating the application. It takes quit code that we wish to send, such as 0 for success or 1 for failure. Since there are numerous messages, many of which we don't care to process, they need to go somewhere. The solution is to send those messages back to the OS through the DefWindowProc() function (DefaultWindowProc). Simply pass the parameters to it and call it a day. You should note, WndProc must be implemented in the same .cpp file as the WNDCLASS discussed next.
The Window Class
bool InitWindow( HINSTANCE instanceHandle, int show )
{
    WNDCLASS wc; // Datastructure that holds the details of the windowclass which describes our window.
    ZeroMemory( &wc, sizeof( WNDCLASS ) ); // Initialize the structure.

    wc.style            = CS_HREDRAW | CS_VREDRAW;                  // Class styling. Allows for additional behaviours of the window.
    wc.lpfnWndProc      = WndProc;                                  // A function pointer to the Window Procedure.
    wc.cbClsExtra       = 0;                                        // Extra bytes to allocate to the window class structure.
    wc.cbWndExtra       = 0;                                        // Extra bytes to allocate to the window instance.
    wc.hInstance        = instanceHandle;                           // The module handle of this application.
    wc.hIcon            = LoadIcon( 0, IDI_APPLICATION );           // Icon of the window.
    wc.hCursor          = LoadCursor( 0, IDC_ARROW );               // Cursor used by the window.
    wc.hbrBackground    = ( HBRUSH ) GetStockObject( WHITE_BRUSH ); // Paints the window white.
    wc.lpszMenuName     = 0;                                        // Name of an associated menu.
    wc.lpszClassName    = L"D3DWindowClass";                        // Name of the window class this structure will become
The InitWindow() function is what we're using to create our window. The process works by filling out a WNDCLASS structure (or WNDCLASSEX if you want more granularity). This structure is how we define various attributes that define a window. We have fields such as style can be used to tell how the window is drawn under certain conditions such as CS_HREDRAW and CS_VREDRAW, which cause the window to be 'painted' when they're moved Vertically or Horizontally. There are other effects/styles that can be combined with bitwise OR as well. There is a field for us to pass a function pointer to the Window Procedure. The next two fields we don't utilize in this post, however; you should be aware of them as they're extremely useful. They are for allocating extra memory to the class (ClsExtra) or the Window instance (WndExtra).
These fields for extra bytes can be particularly useful when you're utilizing these Windows in OO manner since with these extra bytes we can store an object that contains a WndProc as one of its methods. This allows us to define a WndProc as a member method rather than a local function. We setup a local WndProc to simply forward the events to the OO WndProc like so.
LRESULT CALLBACK InternalWindowProc( HWND hwnd, UINT msg, WPARAM wparam, LPARAM lparam )
{
	LONG_PTR ObjPtr = GetWindowLongPtr(hwnd, 0);

	if (ObjPtr == 0) {
        return( DefWindowProc( hwnd, msg, wparam, lparam ) );
	} else {
	    return( ((MyObject*)ObjPtr)->WndProc(hwnd, msg, wparam, lparam) );
	}
}
class My_Object_That_Implements_WndProc
{
public:
// Some methods
// Our WndProc
virtual LRESULT CALLBACK WndProc( HWND hWnd, UINT msg, WPARAM wParam, LPARAM lParam );
// Some data members.
};We can store the above object inside a Window instance (WndExtra). The first argument is the handle (HWND) to the window, then the byte index (offset) of the allocated memory region, and finally a pointer (cast to LONG_PTR) to your object that implements the WndProc function.
SetWindowLongPtr( windowHandle, 0, (LONG_PTR)( procObj ) );We're not utilizing this technique (yet) in our example, but it is good to know that it exists.
Next we have that all too familiar HINSTANCE which, if you recall, is the handle to our process. The next two fields are the Icon and Cursor that we will use in the window. We're loading the OS defaults for our window. The next field is the hbrBackground which tells the OS how the window should be drawn such as color or other effects.
lpszMenuName is used if we wish to associate a menu with our window. lpszClassName is an essential field since its the name for this WNDCLASS. It's one of the parameters that we pass to the CreateWindow() function. The reason this is necessary is because the WNDCLASS acts as a blueprint for a window. The class can be instantiated multiple times for multiple windows.
Now that our WNDCLASS is filled out, we have to register the class with the OS. This is done through the RegisterClass() function ,which takes a pointer to a WNDCLASS. It returns a BOOL (Windows integer typedef) result that we can use to see if it succeeded or failed. If it failed to register the class, we can call GetLastError() to get the error code that corresponds to the issue. The list of error codes can be seen here.
// Check if the window class failed to register. If it did the function will be a false value.
    // In that case we will print the failure and the error code associated with it.
    if ( !RegisterClass( &wc ) )
    {
        MessageBox( 0, L"RegisterClass FAILED. Error code: " + GetLastError(), 0, 0 );
        return false;
    }
Create Window
	gMainWnd = CreateWindow(
        L"D3DWindowClass",          // Which window class do we want to instantiate.
        L"Hello, World",            // title of our window.
        WS_OVERLAPPED | WS_SYSMENU, // window style. We're specifying a window with a title bar and a thin border
        gXPos, gYPos,               // Starting position of the window in pixel coordinates.
        gWidth, gHeight,            // Starting size of the window in pixels.
        0,                          // A handle to the parent.
        0,                          // A handle to a menu
        instanceHandle,             // A handle to the instance of this application.
        0 );                        // Extra creation parameters.

    // Check if the CreateWindow function failed. If it did the window handle will be zero.
    // In that case we will print the failure and the error code associated with it.
    if ( gMainWnd == 0 )
    {
        MessageBox( 0, L"CreateWindow FAILED. Error code: " + GetLastError(), 0, 0 );
        return false;
    }

    // Display the window and update that state.
    ShowWindow( gMainWnd, show );
    UpdateWindow( gMainWnd );

    return true;
Here we're calling the CreateWindow() function, which takes the class name from which we wish to create a window. It will also take a string for the window caption, which is the text that appears at the top of a window. Here we're specifying the style of our window which tells the OS how it should look. These styles can be bitwise ORed together to combine them. Some styles like WS_OVERLAPPED already contain multiple styles. We also specify the position that the window should start at with xPos and yPos as well as the width and height. The next parameters are handles to a parent window, a menu, our process. The last parameter is for extra creation parameters which you can read here.
The return value of a CreateWindow() is a HWND, however; this function can fail. Failure is signified by a null (zero value) HWND. If it fails, we simply open a message box to state the failure, additionally; we use GetLastError() again to retrieve the failure code.
If CreateWindow() was successful we will now display the window with ShowWindow(). We will also call UpdateWindow() to update the client area of the window.
The Message Pump (Loop)
void Run()
{
    MSG msg = { 0 };

    while ( true )
    {
        // Check if messages are sitting in the queue.
        if ( PeekMessage( &msg, 0, 0, 0, PM_REMOVE ) )
        {
            // Translate virtual-key messages into character messages.
            TranslateMessage( &msg );

            // Send the message to the WndProc function.
            DispatchMessage( &msg );

            // If we recieve the quit message then its time to break out of
            // the loop and end the application.
            if ( msg.message == WM_QUIT )
            {
                break;
            }
        } else
        {
            // Here is where we will put our loop logic for rendering.
        }
    }
}
So we can create a window and handle the messages sent to that window, but how do we receive those messages? I introduce to you the message pump. Here we're using PeekMessage() to see if there are any messages on the queue. If there is, it removes them and stores them inside of the msg structure and returns true. This then causes us to translate and dispatch those messages to the WndProc. If there are no messages, we will process our rendering loop. For PeekMessage() we pass the parameters of a MSG struct, (which contains the actual message), several null values, and an enumerator instructing the function to discard messages from the queue after we dispatch them. There are some additional parameters that can be used for filtering, the first of which says what window you want to receive from. The other two parameters are for specifying a min and max for the messages you want to receive.
Another message function which performs a similar task called GetMessage(). Unfortunately this function isn't ideal for a real time applications since it is blocking until it receives a message.
Conclusion
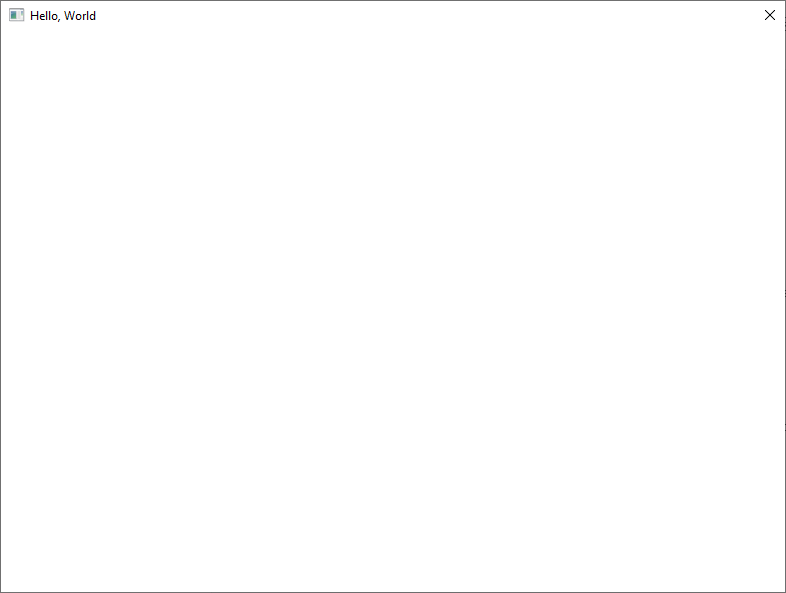
If you successfully in implemented the above code, you see the same window below when you press f5. This is all it takes to create a window using the Win32 libraries. Unfortunately, this is just the tip of the iceberg for the Win32 libraries. You could probably spend months or possibly years learning this library in its entirety.
If you wish to learn more about various aspects of Win32 I suggest going to MSDN which hosts all of Microsofts documentation. Additionally, I have provided links for all of the functions and structures used in this demo. I highly suggest reading through them to figure out all of the options available to you. As an excercise I recommend trying to configure the window to run in borderless mode.
The link to the code on GitHub can be found here.